B Keyboard shortcuts
Keyboard shortcuts allow you to quickly and efficiently access commands that would otherwise only be available via drop-down menus, info windows, or palettes. Unfortunately, the official documentation does not include an overview of the already built-in default shortcuts. This makes it difficult to systematically assign shortcuts for additional commands. Here is an overview and suggestions for additional shortcuts.
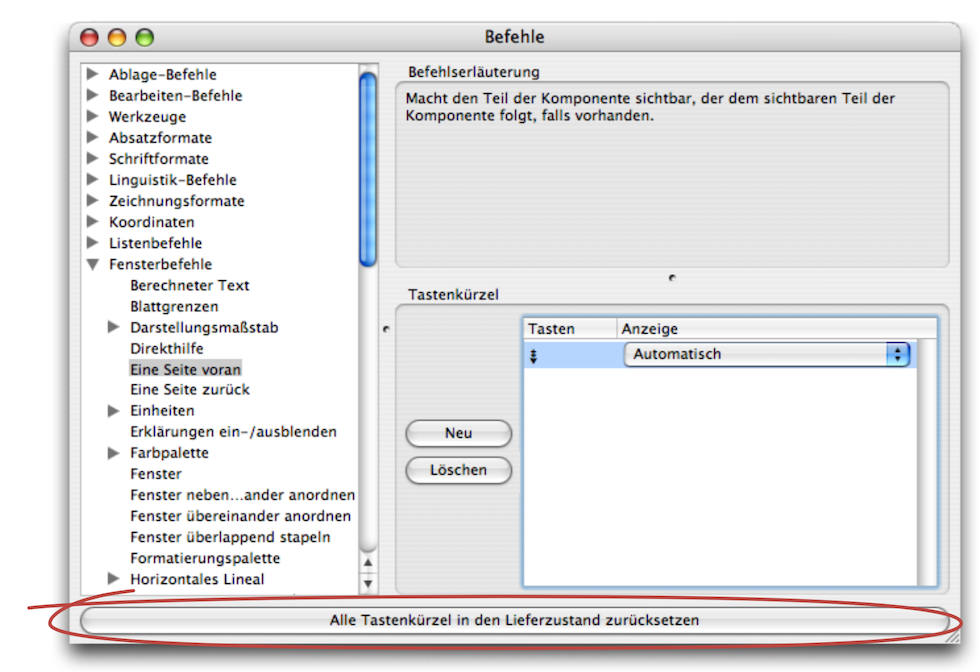
Of course, you can also get an overview yourself. First, by looking at the shortcuts displayed in the menus and drop-down menus. But that's not all! Open the «Commands» window with «Extras ➝ Keyboard Shortcuts…». Expand all command groups and then go through each command using the - key. You will also need to expand the subgroups. This will reveal commands that are not found in any menu. Just one example: in the «Window Commands» group, there is a command called «One Page Forward» (see Fig. B.1) that is not listed in any menu.
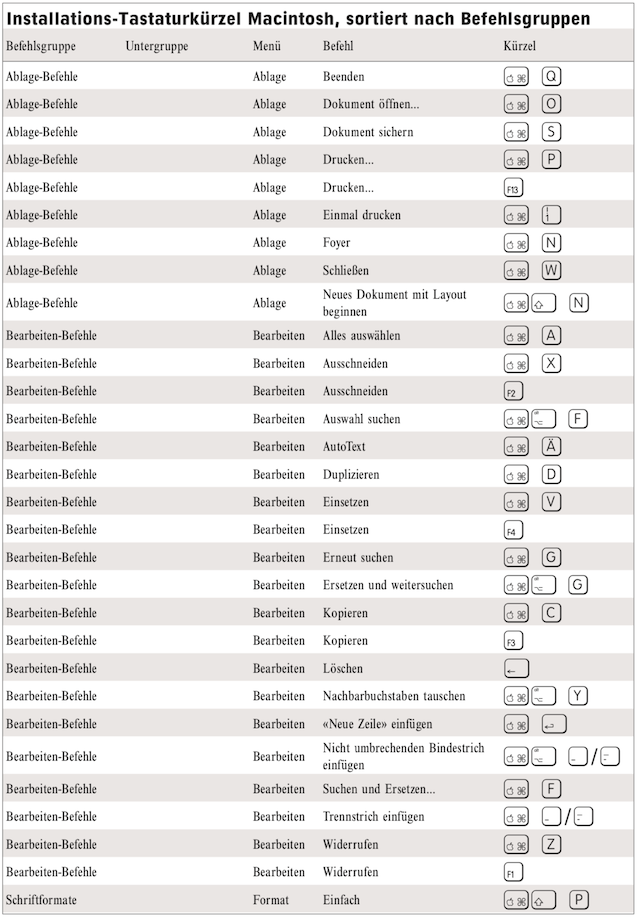
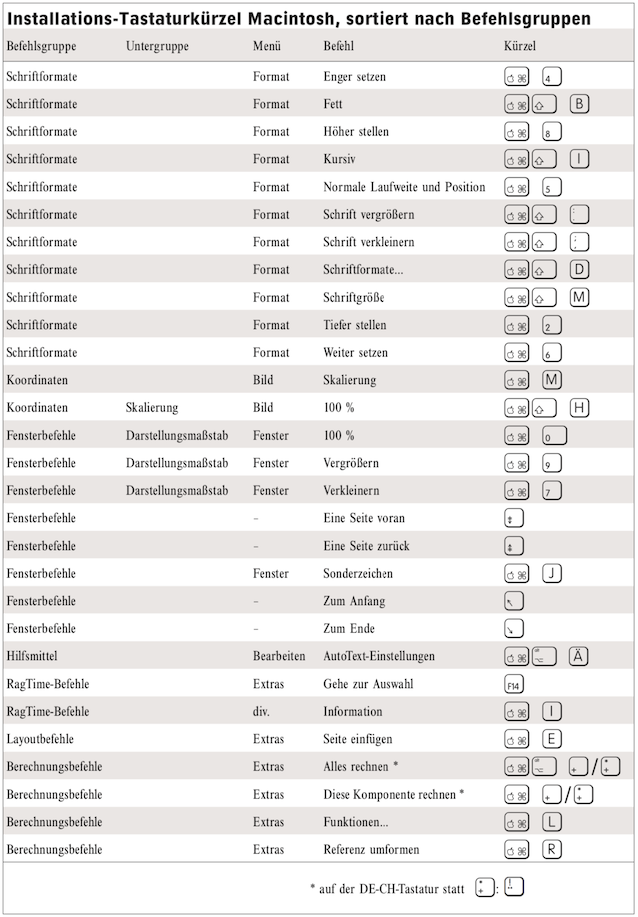
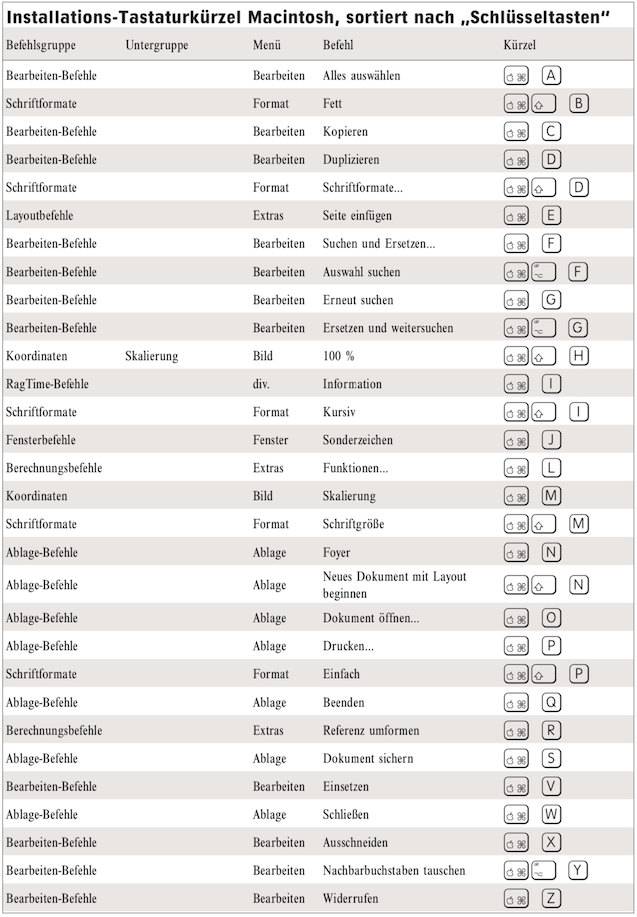
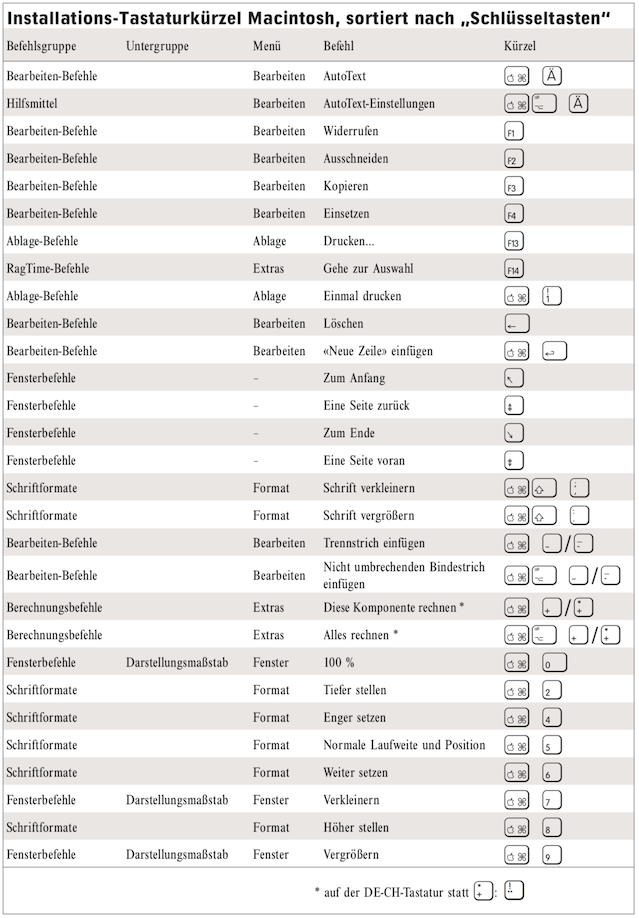
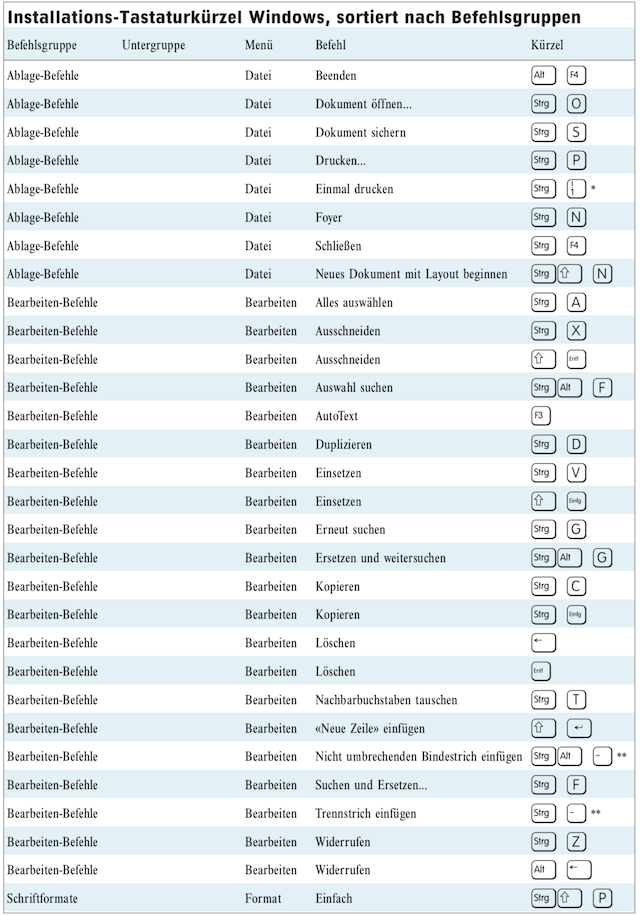
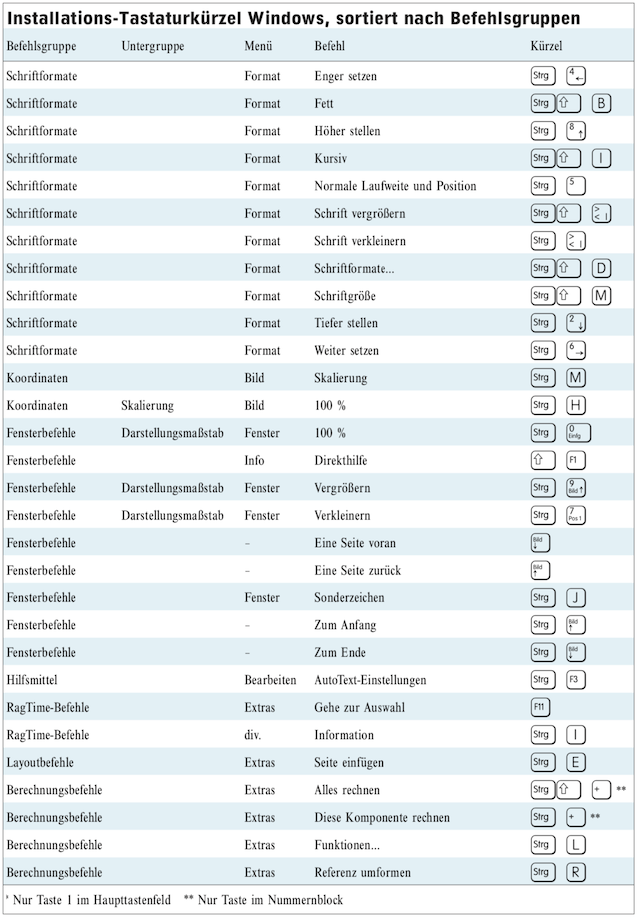
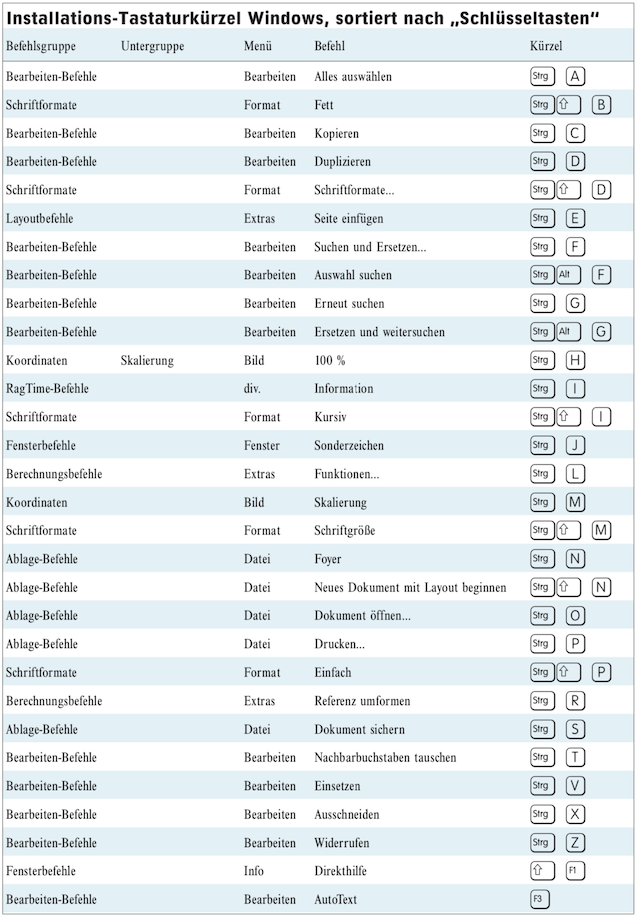
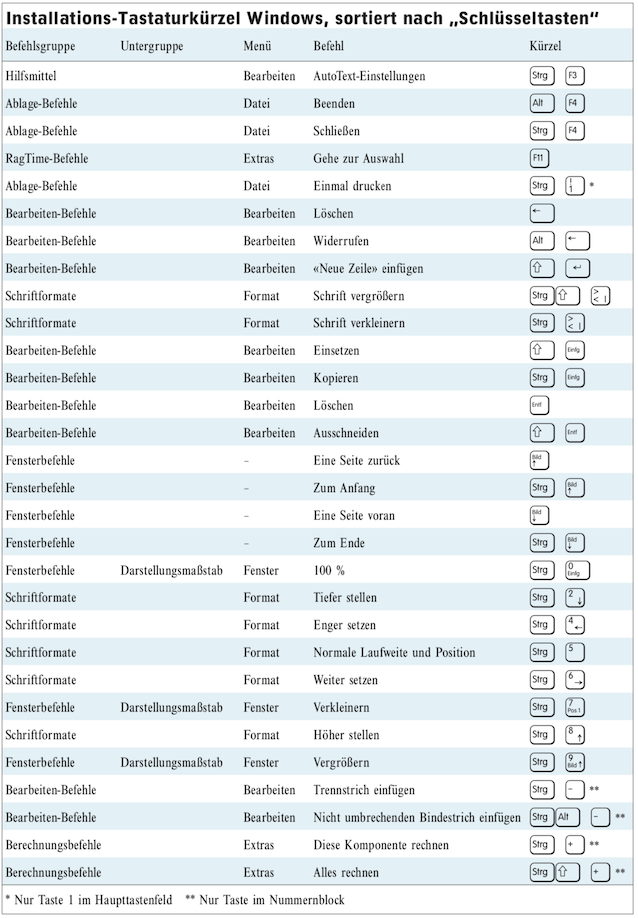
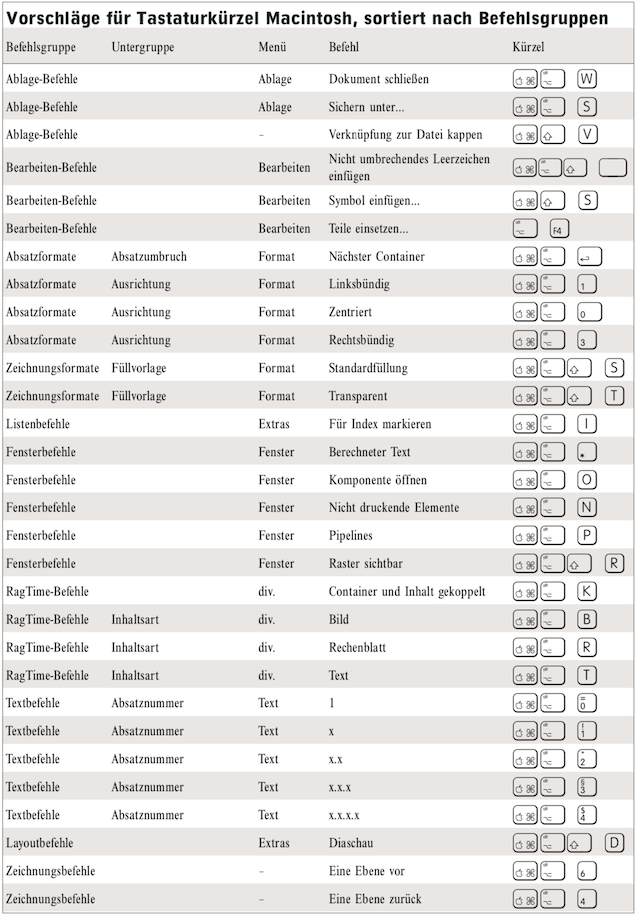
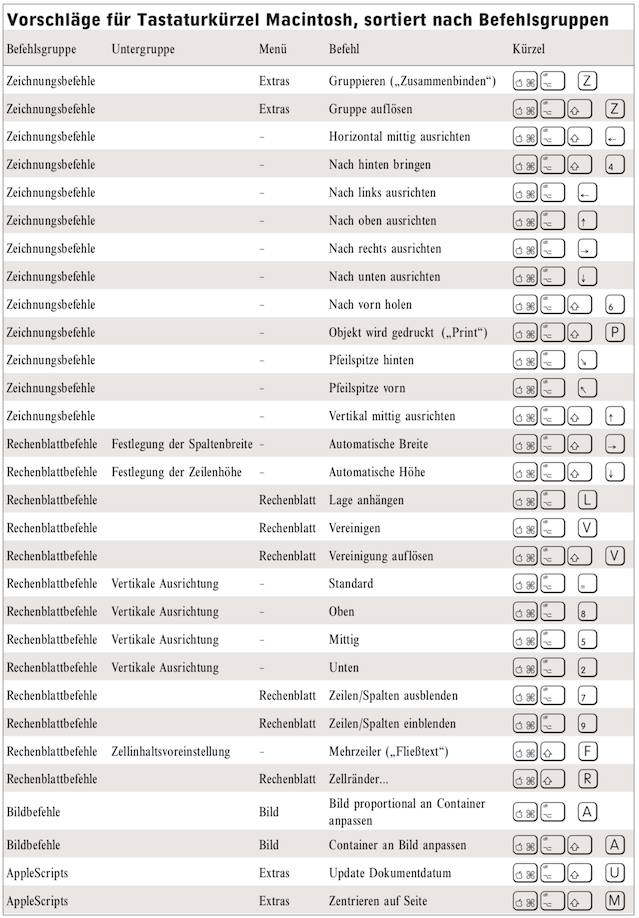
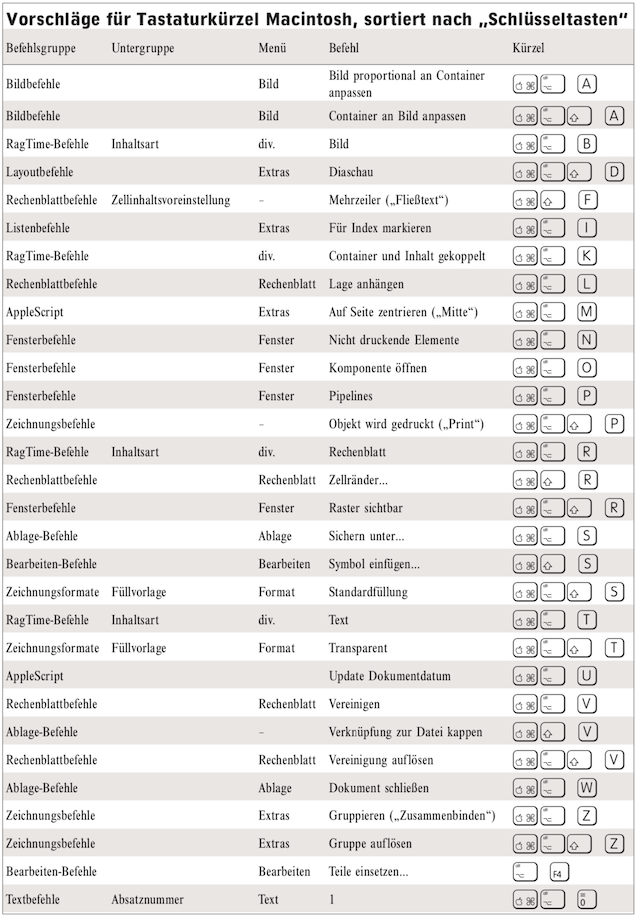
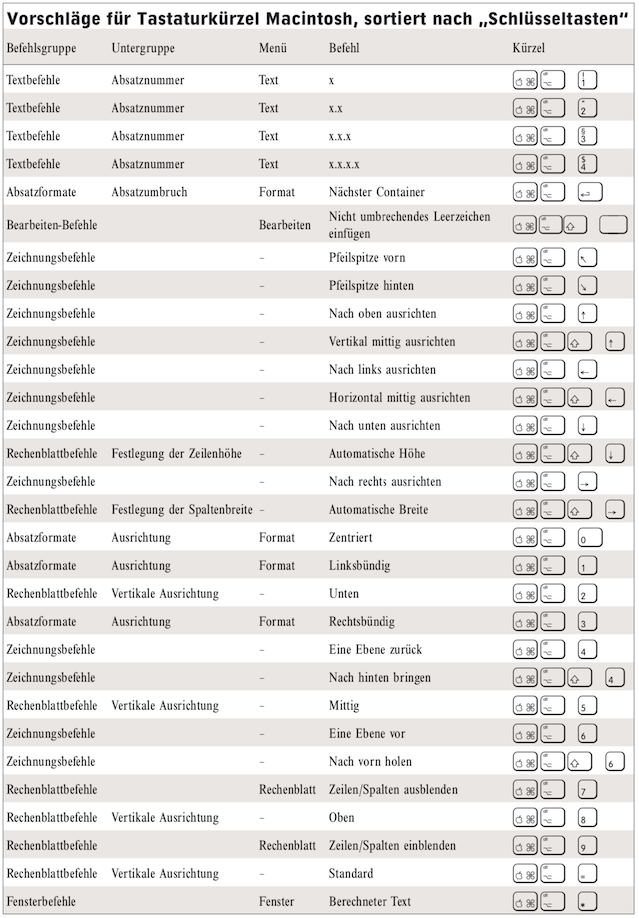
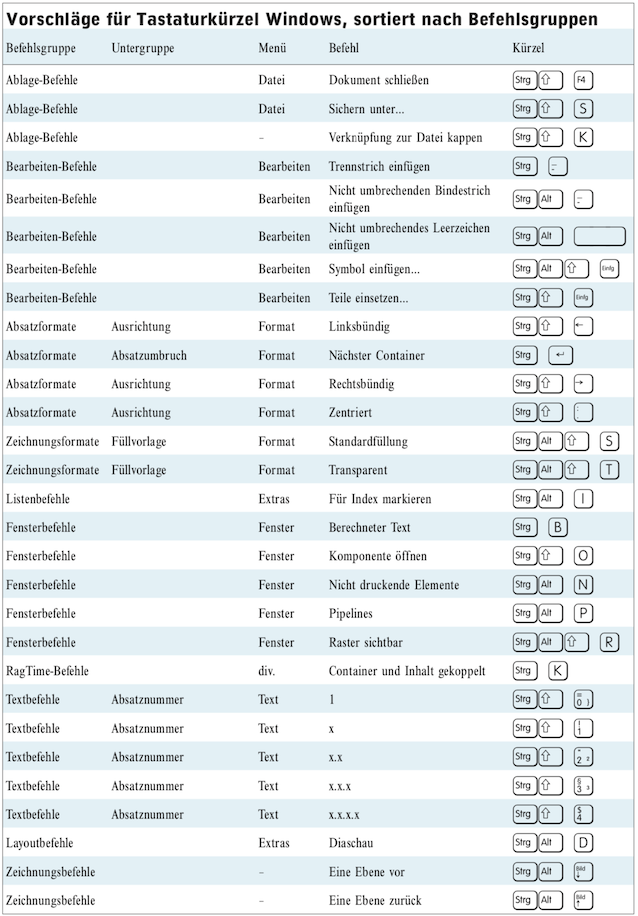
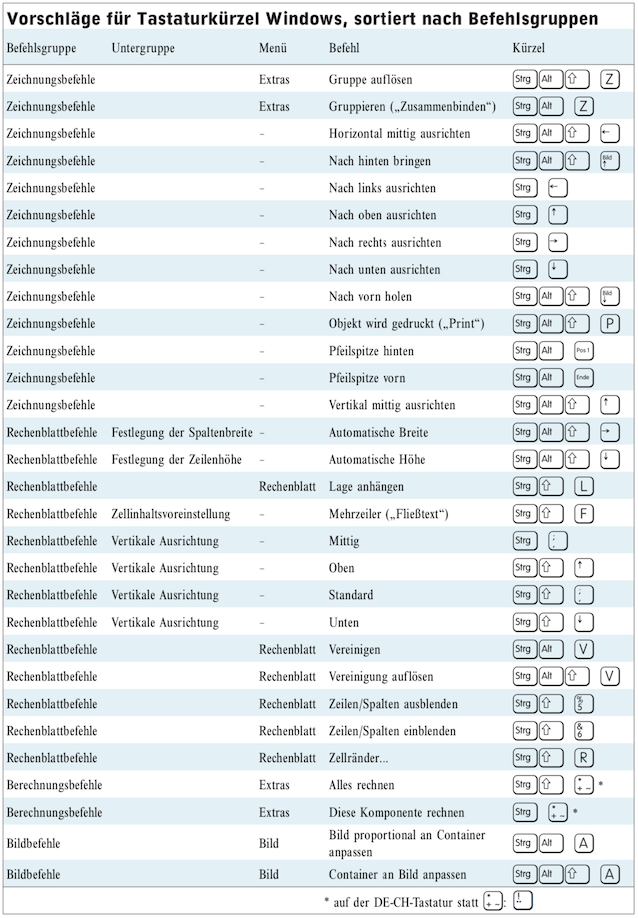
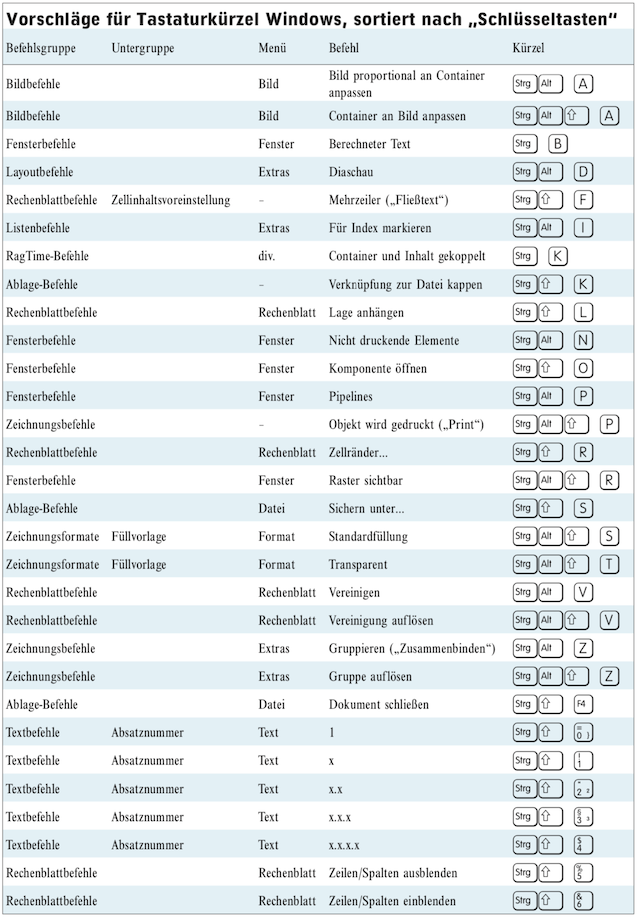
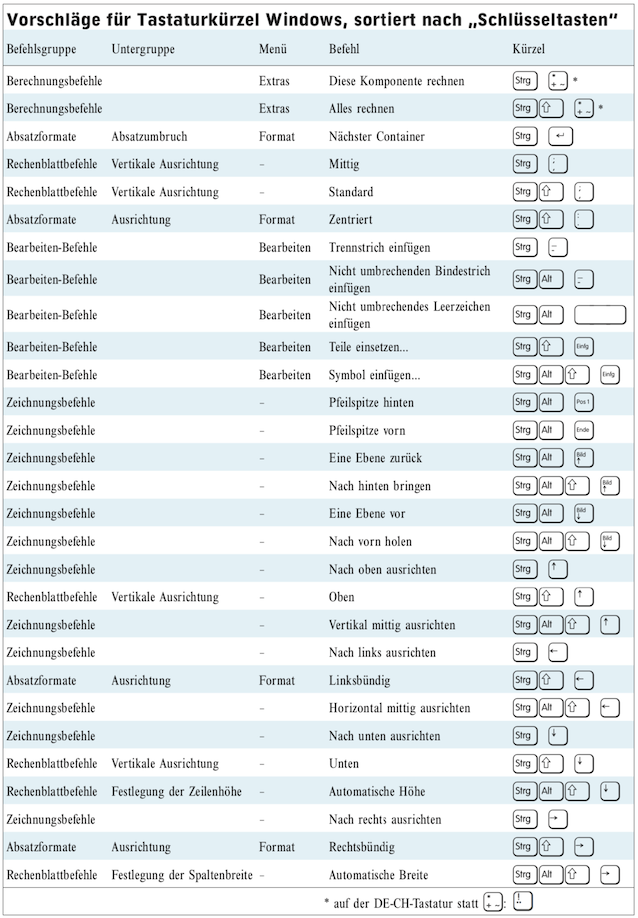
To find all keyboard shortcuts, you need to briefly glance at the list of keyboard shortcuts for each command as you “browse” through the command list. This is the only way to see whether or not a shortcut has been defined for the command. For a few commands, two shortcuts are even specified – typically a function key next to another key combination, or when both one of the keys on the numeric keypad and its counterpart on the standard keyboard can be used as the “key”. Well, we have done this for you and compiled the shortcuts we found into two lists, one sorted by command groups and the second by the “key” used in the shortcut. You will find these tables for Mac in Fig. B.6/Fig. B.7 and for Windows in Fig. B.8/Fig. B.9. These tables are primarily intended to help you find the commands in the list in the «Commands» window so that you can change or assign shortcuts. The «Menu» column is only intended as a reference to where the command in question can be found. It may also be located in a drop-down menu of this main menu. If several shortcuts are assigned to the command, only one of them is displayed.
The key symbols may differ from those shown in the tables. Depending on the make of computer, the symbol on the delete key, also known as the backspace key, may be a normal left-pointing arrow in one case and a crossed-out square with a left-pointing arrow in another. With a little imagination, you will find the right key. However, apart from the case documented in the table, the key is always clearly identifiable.
By assigning your own keyboard shortcuts, you can essentially create your own user interface for RagTime. It's worth it! Many commands are difficult to access via drop-down menus, or they are arranged in information panels or palettes that must first be opened. Depending on how you work with RagTime, you will use such commands repeatedly and will therefore be glad if you can call them up directly with a shortcut.
To assign a shortcut to a command, you first have to find the command in the list. In many cases, the assignment of commands to groups in the command window is difficult for users to understand. Here is another example: The «AutoText» command can be found in the «Edit Commands» group. But where is the corresponding «AutoText Settings…» command? You will find it in the «Auxiliary Commands» group, even though it does not appear in the «Windows ➝ Auxiliaries» menu. Searching for a specific command can therefore be quite difficult and sometimes requires imagination and perseverance.
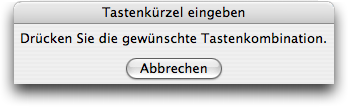
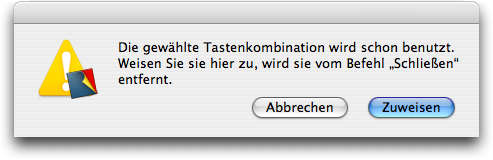
Once you have found the command to which you want to assign a shortcut, click on «Create» in the «Keyboard Shortcuts» field. You will then be prompted to press the desired key combination (Fig. B.2). If the combination you entered is already taken, RagTime will inform you (see Fig. B.3). You can choose whether you want to delete the shortcut you entered for the command to which it was previously assigned – in the illustrated example, the «Close» command – and use the key combination for your “desired command», or whether you want to cancel the process. Think carefully before eliminating an existing keyboard shortcut. More on this, and how you can find suitable shortcuts, will follow later.
RagTime not only allows you to assign your own keyboard shortcuts to additional commands, but also to change the default shortcuts. However, we recommend that you leave these shortcuts in their “original state”. You may not see any use for one or two of the commands that can be called up with them at first and would prefer to use the key combination for your own shortcut. However, it is quite possible that you will suddenly find yourself using this command intensively in future RagTime tasks. Perhaps someone will give you a tip on how to do something particularly practical using a specific shortcut. It would be unfortunate if this shortcut had a completely different effect for you! If you ever come across RagTime on someone else's computer, you will also be glad if the shortcuts call up the same commands you are used to.
What does the «Reset All Keyboard Shortcuts to Delivery State» button at the bottom of the command window (marked in red in Fig. B.1) do? Don't worry! Your individually assigned additional keyboard shortcuts will not be deleted. Only if you have changed a shortcut that was originally installed will this change be reversed. With one caveat: if you have deleted a shortcut, this command will not “bring it back to life”.
For commands with two or more abbreviations, you can choose how they are displayed in the menu. Obviously, selecting «Never» suppresses the display of the abbreviation. If several abbreviations are marked «Automatic», the one that requires the fewest keystrokes is displayed in the menu. At the same time, it is placed first in the command window. With «Preferred», you can force a shortcut to be displayed in the menu, even if it requires more keystrokes than others. For example, on a Mac in its factory state, the shortcut AP is displayed in the menu for the command “«File ➝ Print…», even though r would actually be shorter.
The following tables provide an overview of the keyboard shortcuts available during initial installation, separated by platform, in two versions: sorted by command group and by “key” of the shortcut. These lists – especially the one sorted by “keys” – are a good basis for assigning your own shortcuts to additional commands without conflicting with existing shortcuts. However, you still need to be careful: certain shortcuts may already be assigned by the operating system. In macOS, for example, A“D brings up the Dock, so it is not available for RagTime. Other shortcuts are reserved for taking screenshots. You will know that you have picked such a key combination if you try to enter the shortcut and the message shown in Fig. B.2 simply does not disappear. In this case, the shortcut is intercepted before RagTime ever knows about it.
Abbreviations should, of course, be easy to remember. And there are “keys” that should be used multiple times. Here, substitute terms must be used. We would like to help you find conflict-free abbreviations. Based on our experience, we have compiled a list of commands that are used very often, depending on the task at hand. We suggest an abbreviation for each of the commands. These tables are also available separately for both platforms and in both sorts (from Fig. B.10 ff.). This makes it easier for you to locate the commands in the command list for entering abbreviations and to find other free combinations. Due to the circumstances described above, this task proved to be quite difficult for Windows, and unfortunately we were not always able to find combinations that were easy to remember.
Don't enter all these shortcuts right away. Even we can't remember them all. Typically, you will use a group of these commands when performing a specific task with RagTime, e.g. inserting images into a spreadsheet, and you will memorize the shortcuts during this time. Then define the corresponding shortcuts for the image commands and spreadsheet commands groups. Leave these defined even after you have finished your work. You may need them again. And our tables will help you avoid conflicts. Of course, it cannot be ruled out that you will frequently use other commands in your work and want to assign a shortcut to them. On the Pumera website, we will also provide a document that you can use to manage these tables yourself, so that you always have your own preferences at hand.
It is noticeable that RagTime did not use the 6 key for its shortcuts on the Mac platform. We have adhered to this convention in our suggestions for custom keyboard shortcuts. Below, we briefly explain the reasons for our selection of some commands for which we suggest shortcuts, especially where the reason is not obvious. This will help you decide whether you want to define the corresponding shortcut for yourself. Where we had to resort to alternative terms for memorable shortcuts, we have added these to the command in brackets in our tables.
The «Close Document» command is useful because many windows can be open for a RagTime document, and it is very tedious to have to close them all before the document can finally be closed as a whole. The «Close Document» command makes this much easier: “Seven at one blow!”
«Cut Link to File» is useful in connection with image editing. Often, the option for image import is set so that the link to the original file remains intact. With this command, you can easily ensure that all image data is stored in the document.
With «Next Container», you can easily move the paragraph to a new container while writing, perhaps to the next column or the next page, depending on how the layout and pipelines are set up. The other «Paragraph Format Commands» not only align text in text containers, but also work in spreadsheets, where they are frequently used.
The window commands can be used to suppress or reactivate the display of various elements. This is very useful when laying out documents.

On the Mac, AppleScripts, which are equivalent to commands, can also be assigned shortcuts. For example, if you have a table in two documents in which a specific area is to be sorted repeatedly using different sort keys, and you have created an AppleScript called «Sort Table» for each of these, you can define the same shortcut for both commands. In this case, the shortcut only applies to the corresponding command in the active document.
The RagTime expert pages (in German!) contain two documents with useful scripts in the «Mac-Ecke» section: «Skripte Layout» and «Skripte Zeichnen». We also recommend a shortcut for one of these scripts, «Zentrieren auf Seite», which we consider particularly useful. How do you get this and the other scripts into your RagTime? Download the document from the expert pages, open the document, and then open the AppleScript window with «Extras ➝ AppleScript ➝ Manage Scripts…». In the left column, expand the script list for the document and drag the desired scripts to the top of the RagTime 6 Auxiliaries list (see Fig. B.4). From now on, these scripts will be available to you in all documents.
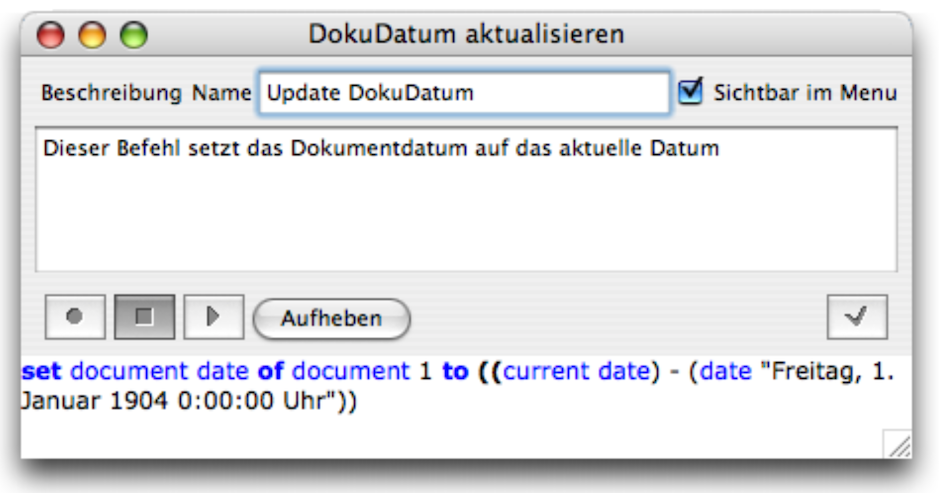
For another command for which we suggest an abbreviation, we also provide the corresponding script: it updates the document date to the current day and consists of a single line of code, which is not trivial (Fig. B.5).
Keyboard shortcuts can also be defined for symbols. In the list opened with «Edit ➝ Insert Symbol… ➝ Favorites», you can assign a shortcut to each symbol entered there. If you value typographically correct characters, you will certainly assign such a shortcut to the narrow space (non-breaking!), the non-breaking space, and the apostrophe, for example. Of course, we have also assigned such a shortcut to the arrow we used when listing commands for the hierarchical structure – this is only an example and a suggestion for your own symbol shortcuts. Since we previously did not use key combinations with the 6 key for the Mac platform, you can use this key for this purpose. This will ensure that you avoid conflicts with RagTime command shortcuts. To avoid conflicts with the operating system, it is best to add another modifier key.
Due to the lack of available modifier keys, Windows unfortunately does not offer a separate area such as a “symbol area”.
(Continuation after the tables)
For command and symbol shortcuts, there is only a finite number of possible shortcuts available, for better or worse.
Please note that there can be no conflicts with «AutoText». The «AutoText» function is called up using an abbreviation. After that, a key sequence is responsible for selecting between the different texts, not an abbreviation of the type used for commands and symbols. If you run out of possible abbreviations for your symbol favorites in Windows, define them as «AutoTexts». This way, they are also quick and easy to access.